

How to Charge Rechargeable Fan Safely and Quickly
You've unpacked your fan, the cruise cabin feels warm, and the only available outlet is already crowded with chargers. The fan's light is blinking, but you're not sure whether it's charging, whether the USB port is powerful enough, or whether leaving it plugged in overnight is sensible.
The practical answer to how to charge a rechargeable fan isn't just “find a USB port.” You need to match the fan's input rating, use a suitable cable and power source, give the battery room to dissipate heat, and unplug it when charging finishes. Cruise cabins make those habits more important because outlets and USB ports can be limited, shared, or modest in output.
Table of Contents
- Introduction to Charging Your Rechargeable Cruise Fan
- Know Your Charging Port Cable and Power Source
- How to Charge Your Rechargeable Fan Correctly
- Understanding Charging Times and Battery Capacity
- Essential Safety Tips for Everyday and Travel Charging
- Troubleshooting Charging Problems and When to Replace
Introduction to Charging Your Rechargeable Cruise Fan
A rechargeable fan usually uses a small lithium-ion battery. That battery charges in two stages, first with constant current, then with constant voltage while the current gradually tapers. This is why the advertised operating time doesn't tell you exactly how long charging will take. Battery capacity, charger output, internal charge circuitry, cable condition, and heat all affect the result. Mouser's lithium-ion charging guidance explains the underlying constant-current and constant-voltage process.
In a real stateroom, the routine is simple once you know what to look for. Identify the port, check the input label, connect the supplied cable, place the fan on a hard surface, and watch the indicator until it shows full. Don't assume that a powerful laptop adapter will make a small fan charge faster. The fan's internal circuit decides how much current it accepts.
A cruise fan also has to coexist with luggage, bedside tables, reading lights, and personal electronics. A shared USB port may charge slowly, while a wall outlet with a certified USB adapter may provide a more predictable supply. You'll want to charge before you need the fan, rather than waiting until bedtime and then placing a warm device under bedding.
Cabin rule: Charge the fan where you can see it, not where you plan to sleep beside it.
By the end of this guide, you'll know how to recognize USB-C and micro-USB connections, estimate a realistic full-charge window, interpret common indicators, avoid unsafe overnight habits, and decide when a charging problem points to a worn-out battery rather than a bad cable.
Know Your Charging Port Cable and Power Source
Start with the fan itself. A USB-C port has a small, rounded opening and accepts the reversible USB-C plug. A micro-USB port has an asymmetrical shape, so the plug only fits one way. Don't force either connector. If the cable doesn't seat smoothly, check its orientation and inspect the port for lint or damage.
Use the cable supplied with the fan whenever possible. The cable isn't the only factor controlling charge speed, but a damaged, loose, or poorly fitting cable can interrupt charging and create unnecessary heat. Most handheld rechargeable fans are designed around standard USB 5 V charging, commonly accepting about 0.5–2 A, according to the charging information summarized in this lithium-ion fan charging reference.
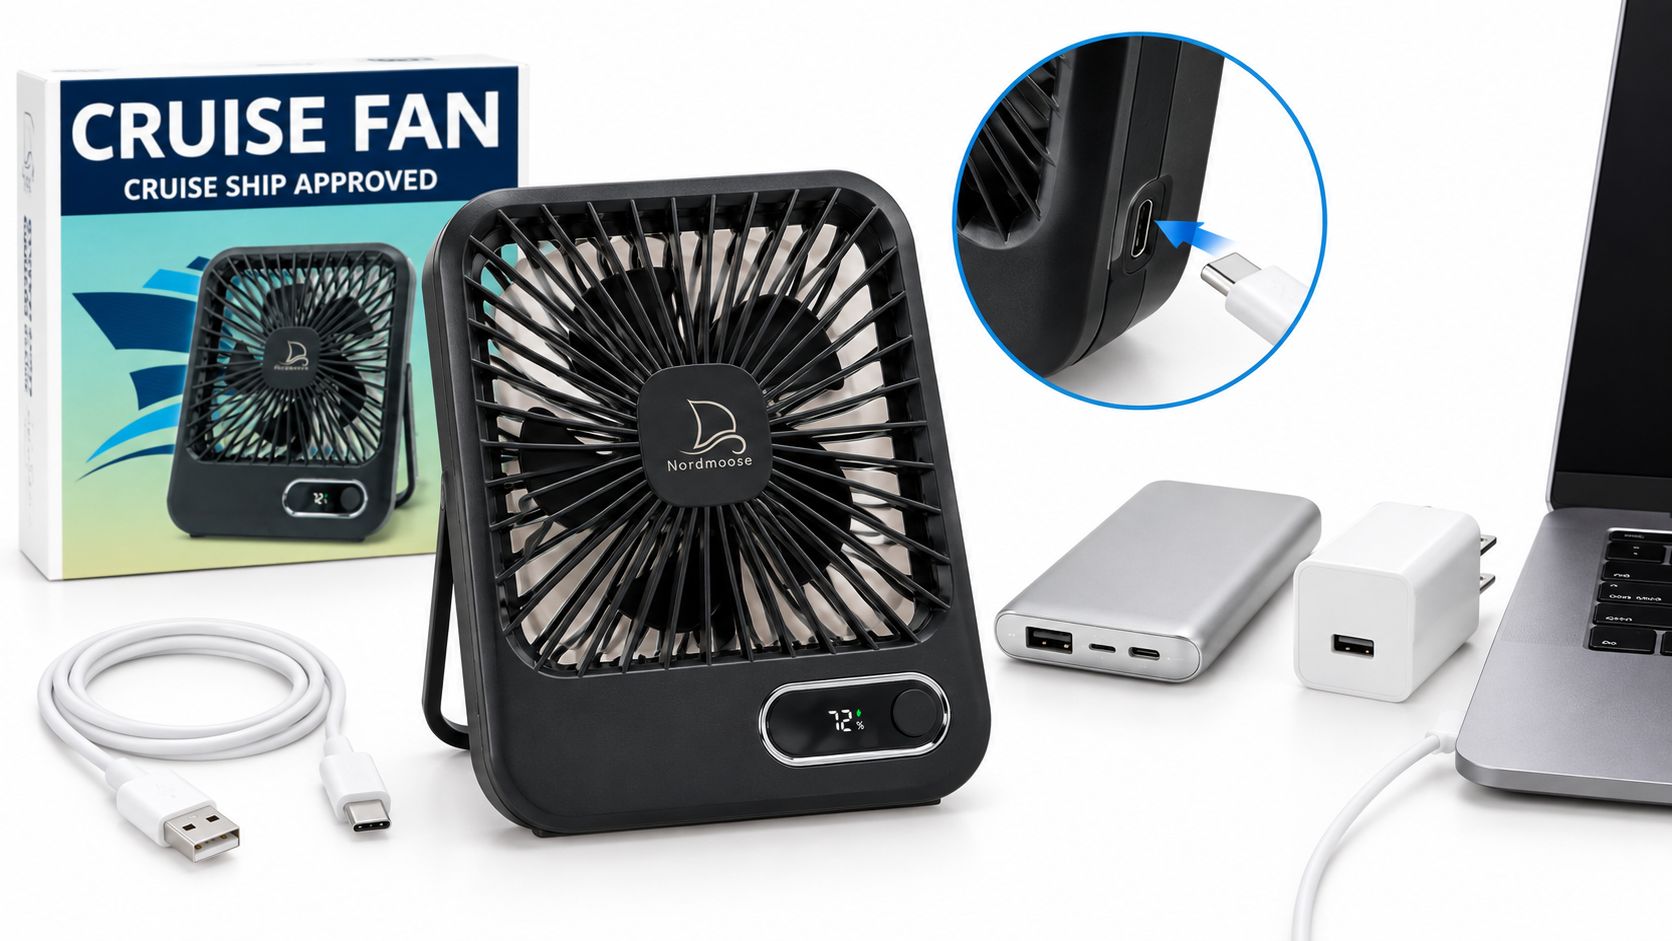
A cabin wall outlet paired with a certified USB charger is generally more predictable than a shared, low-output USB port. Before plugging in, read the fan's input label or manual. A charger that advertises a higher voltage for phones or laptops isn't automatically appropriate unless the fan explicitly supports that charging profile. If you're checking how outlets may be arranged onboard, review this practical guide to cruise ship electrical outlets.
A product such as the Rechargeable Cruise Fan with Magnetic Hook to Hang on Cruise Walls & Ceilings is designed as a compact, rechargeable airflow option for cruise cabins, staterooms, bedrooms, and travel setups. Depending on the model, portable fans may include features such as multiple speed settings or a timer, but those features don't change the need to follow the fan's stated input rating.
Before connecting power, use this quick check:
- Port: Confirm whether the fan uses USB-C or micro-USB.
- Cable: Look for fraying, bent connectors, looseness, or heat damage.
- Adapter: Choose a certified USB charger that supplies the fan's expected voltage.
- Surface: Set the fan on a hard, stable, non-flammable surface, never on a bed or beneath a pillow.
- Position: Keep charging openings and ventilation areas uncovered.
How to Charge Your Rechargeable Fan Correctly
Put the fan on a table or another hard, flat surface before connecting anything. Room temperature is preferable, especially after the fan has been running for a long time or has been sitting in a hot balcony bag. Connect the original cable firmly to the fan first, then connect the other end to the appropriate charger or cabin USB port.
The indicator may glow red, blink, or use another charging color while the battery is filling. Some models switch to green, stop blinking, or turn the light off when full. Because indicator conventions differ, use the supplied manual as the final reference rather than assuming every red or green light means the same thing.
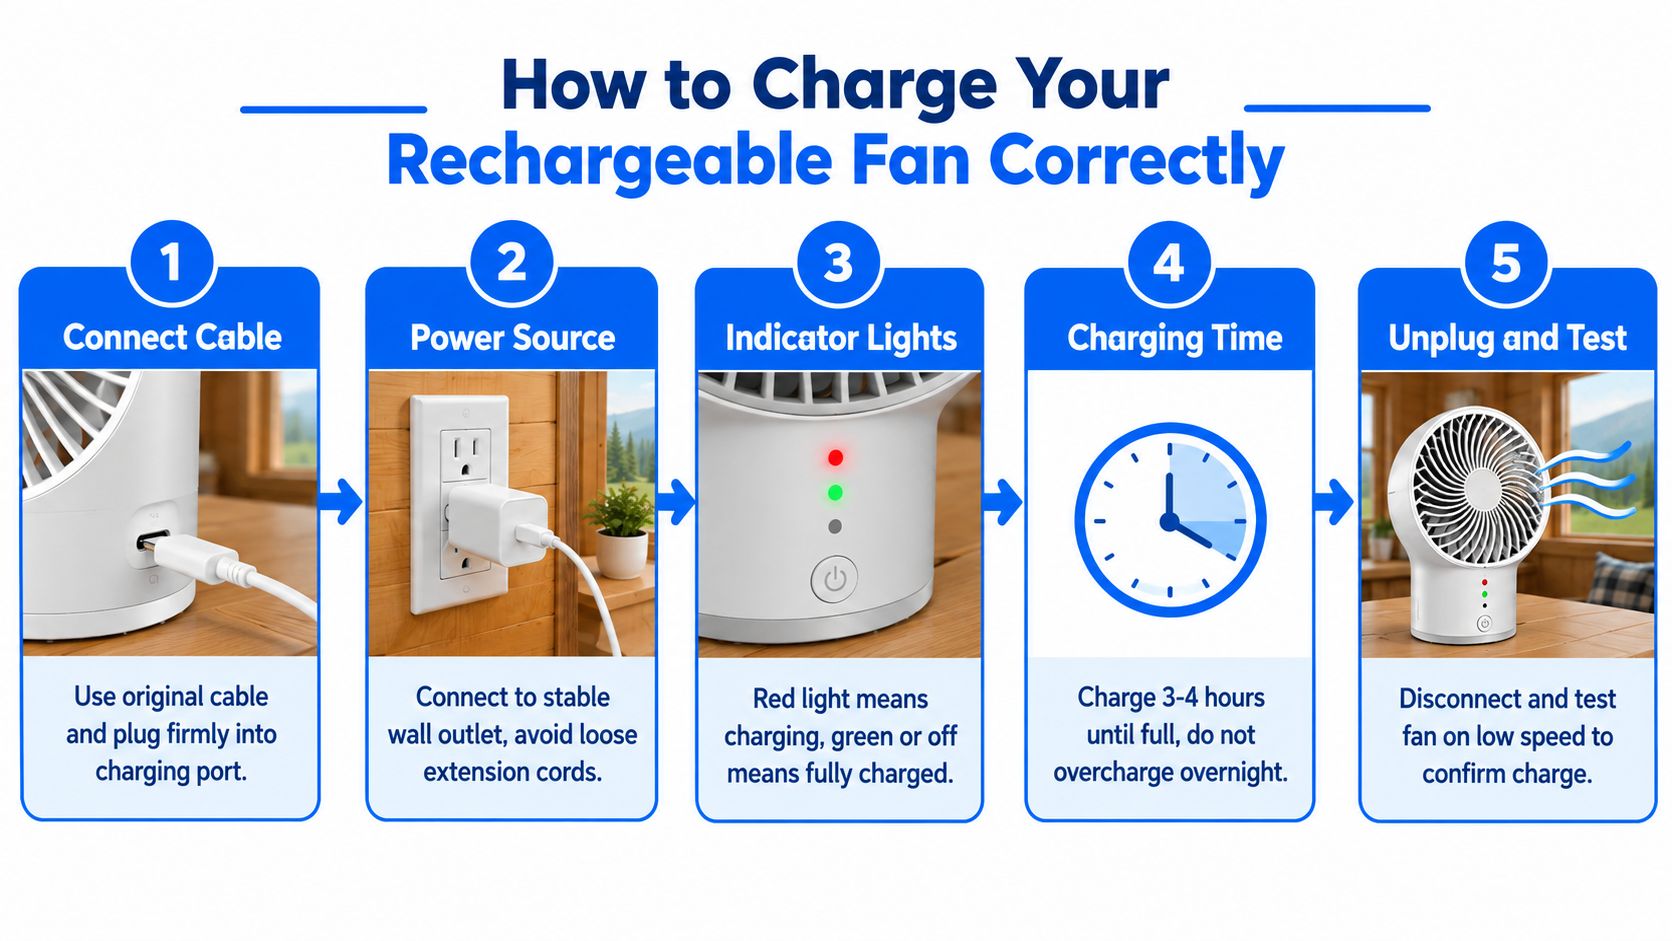
Charging should feel controlled. A little warmth can occur during normal charging, but the fan shouldn't become unusually hot, smell chemical, swell, smoke, or make strange sounds. If it does, disconnect power only if you can do so safely, move away from the device, and stop using it.
Practical rule: Don't run the fan while it's charging unless the manufacturer specifically says that simultaneous use is supported. Running the motor adds heat and can make the charge indicator or completion time harder to interpret.
When the indicator shows full, unplug the fan rather than leaving it connected indefinitely. Independent battery-safety guidance recommends using the original charger and cable, charging on a hard non-flammable surface, and disconnecting when full. It also warns against charging lithium batteries beyond the recommended time, especially with defective or mismatched charging equipment. The safety guidance for small lithium-ion devices is especially relevant when you're charging in a confined cabin.
After unplugging, wait briefly if the fan feels warm, then test it on a low setting. A small rechargeable accessory such as a Magnetic Motion Sensor Night Light for Cruise follows the same useful cabin principle, charge it on a clear surface, confirm the indicator, and store it where it won't be covered by clothing or bedding.
The visual workflow above is also useful for remembering the order of operations. If you prefer a demonstration, this video shows the basic charging process:
Understanding Charging Times and Battery Capacity
Battery capacity is measured in mAh, or milliamp-hours. A larger number generally means more stored energy, but it also usually means a longer recharge unless the fan accepts more input current. A rough engineering estimate is:
Charging time ≈ battery capacity in mAh ÷ charging current in mA, plus about 10–30% for charging inefficiency.
That estimate is only a starting point. Lithium-ion packs use a constant-current stage followed by a constant-voltage stage, so the final portion takes longer as current tapers. A fan may also limit incoming current internally, meaning a 5V/2A adapter won't necessarily deliver 2 A to the battery. This rechargeable fan guide describes common portable battery sizes from roughly 2,000–10,000 mAh and explains why USB-C models can have shorter charging windows when their internal electronics support faster input.
| Battery Capacity | 5V/1A Charger | 5V/2A or USB-C |
|---|---|---|
| 1,200 mAh | About 1.5–3 hours | About 1.2–2 hours |
| 2,000 mAh | About 2–4 hours | About 1.5–3 hours |
| 3,000 mAh | About 3–5 hours | About 2–4 hours |
| 4,000 mAh | About 4–6 hours | About 2–4 hours |
| 5,000 mAh | About 5–7 hours | About 3–4 hours |
| 10,000 mAh | Longer than common handheld-fan windows | Often several hours, depending on the charge circuit |
These are practical ranges, not promises. The values reflect the provided charging guidance for common fan packs, including roughly 1.2–3 hours for 1,200–4,000 mAh batteries on 5V/2A USB charging and roughly 3–4 hours for many 5,000 mAh packs. The safety and charging manual also emphasizes that real use includes charging losses and that operating the fan during charging can cause abnormal heating or early battery failure.
A 3,000 mAh fan connected to a 2 A-capable charger may finish in a few hours, but the fan's electronics remain the bottleneck. USB-C can shorten charging for some models, while a USB-C connector alone doesn't guarantee USB-C Power Delivery or another fast-charging protocol.
For packing decisions, capacity matters more than the connector label. A compact fan with a modest battery may suit short cabin use and recharge readily between activities. A larger unit may provide more operating time but needs earlier charging and more careful planning around the cabin's limited power points. If you're comparing fan use with outdoor travel, this guide to a portable fan for camping offers a useful reminder that battery size and recharge access should be considered together.
Essential Safety Tips for Everyday and Travel Charging
Convenience shouldn't outrank battery condition. Public safety guidance has linked small lithium-ion devices, including handheld fans, with overheating during charging. One recent recall described seven overheating incidents and two fires while charging, so unattended charging deserves more caution than a simple USB compatibility checklist. The public warning and recall document supports a conservative approach.
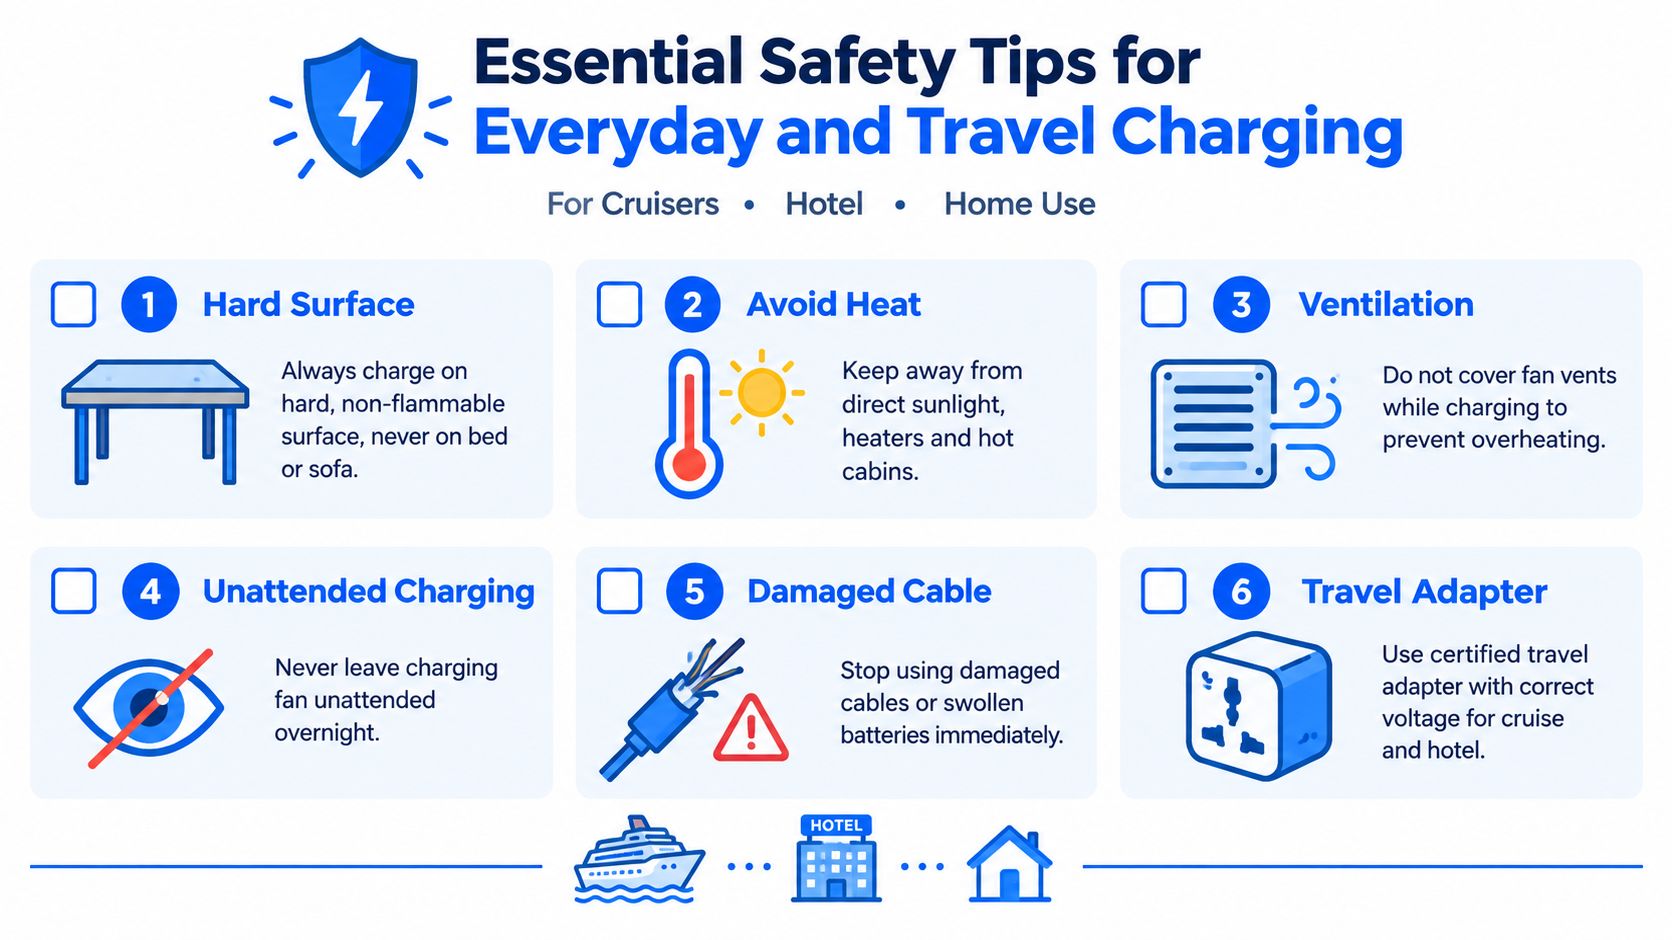
Use the same habits in a cruise cabin, hotel room, airport lounge, or home:
- Choose a hard surface: A table, desk, or counter gives heat a place to dissipate. Beds, sofas, and pillows can trap heat and are flammable.
- Keep it cool: Don't charge in direct sunlight, beside a heater, or in a hot enclosed bag.
- Leave vents clear: Never cover the fan or its charging area with clothing, towels, or bedding.
- Stay available: Avoid leaving the fan charging overnight or while you're away from the cabin.
- Inspect before use: Replace a frayed cable and stop using a fan with swelling, odor, smoke, leakage, or unusual heat.
- Use the right travel adapter: A certified adapter with the correct voltage is safer than guessing based on the adapter's maximum output.
A magnetic cabin accessory such as the Magnetic Cruise Door Organizer can help keep cables and small travel items off the floor, but don't place a charging fan inside a pocket or enclosed compartment. Storage and charging are different tasks. The fan needs an open, stable surface while connected to power.
Overnight charging is particularly tempting on a sea day because you want a full battery in the morning. A safer routine is to charge while you're awake, unplug when the indicator shows full, and place the fan where it's ready for use later. If the fan becomes hot, develops an odor, changes shape, or repeatedly stops charging, don't keep testing it. Move it away from flammable materials if safe, follow the manufacturer's disposal instructions, and contact the seller or a qualified service provider.
The central issue isn't whether every USB port is universal. It's whether the fan's battery management, charger, cable, and surroundings work together without excessive heat or uncontrolled charging.
Troubleshooting Charging Problems and When to Replace
If the fan doesn't charge, start with the simplest checks. Try the supplied cable, inspect both connectors, test a known-good certified charger, and confirm that the charging indicator responds. A loose port, damaged cable, low-output cabin USB port, or unsuitable adapter can all create slow or interrupted charging.
A higher-rated phone or laptop brick won't automatically solve the problem. If the fan doesn't negotiate USB-C Power Delivery or another supported fast-charging profile, it will generally fall back to the voltage and current its internal circuit allows. This rechargeable fan safety guide explains why the charger's headline rating is often less important than the fan's own charge controller.
If charging works but the fan dies soon after unplugging, the battery may have lost practical capacity. A fan that only operates while connected to power is also a strong sign that the battery is no longer serving its intended role. Many small packs aren't practically repairable, and a replacement must match the original battery's voltage and capacity. A mismatch can damage the circuit or reduce performance. Repair guidance for rechargeable fans recommends treating swelling, unusual warmth, odor, and recurring short runtime as stop-use signals rather than routine troubleshooting.
Don't continue charging a damaged fan just to confirm the diagnosis. Retire it according to local battery-recycling or hazardous-waste guidance, and don't place a lithium-ion pack in ordinary trash unless local authorities explicitly say that's acceptable. The same cautious approach applies to compact rechargeable items such as a rechargeable night light.
The reliable cruise routine is straightforward: use the correct cable and power source, charge on a clear hard surface, keep the fan cool and uncovered, watch the indicator, unplug when full, and replace the device when battery symptoms become unsafe.
Nordmoose offers compact rechargeable cruise fans, magnetic cabin organizers, and rechargeable night lights designed around limited stateroom space and everyday travel charging. Visit Nordmoose to review cruise-focused options before your next sailing and choose the accessories that fit your cabin routine.